How To Use Vertical Tabs to Enhance Your Case Study Content
With Bootstrap, you can create sleek vertical tabs that provide a more dynamic, well-organized UX for featuring your case study content.

We love using tabs to organize web content. It's a simple, elegant way to make the customer experience on a page more engaging. Oh, and increase conversions.
In a previous post, we showed you how to create tabbed nav pills to highlight different product features. In this article, we'll show you how to use vertical Bootstrap tabs to create a killer case study experience on your website, so you can take your bragging rights to the next level.
Case studies are the "proof in the pudding." Companies of all sizes – and across industries – rely on them as a critical part of their sales and marketing strategies. Case studies are like gold because they give your prospects an overview of successful customer experiences with real-world examples, and this helps inspire trust.
Whether you're a developer showing off your latest project, or a business sharing a complex solution, it's important to provide context with your creations. Having succinct, well-written case studies on your website can provide essential details around your products, services, and expertise – and allow you to dive deeper into the process and demonstrate your innovative thinking. All stuff that makes a customer more inclined to buy from you.
And let's not forget: by sharing case studies online, you're making it easier for prospects to find, read and learn about what you sell... even when you're not there to sell them.
Writing Good Case Studies
Most case studies follow a similar pattern, outlining the challenge, solution, and results for a real customer. You can organize relevant content around your audience to reflect their journey and segment by industry, roles, or even products. There's lots of room to customize, as long as you're providing these key ingredients.
While you're here, we've got a few more pointers for making your case study content more impactful:
- Try writing your case studies in an approachable manner and resist the urge to get too technical.
- Talk about specific customer outcomes, ROI, or alignments with KPIs.
- Provide only the essential customer information and, if possible, link to the live website or project.
- Don't forget the role of SEO – a little keyword research can go a long way.
- Ask your customer for a quote or validation, and remember to get their input and permission to use your case study.
- Selecting strong case studies for your website should be about quality, not quantity, but 3-5 is a good place to start.
Remember that one really good case study can cover a lot of ground, especially if it reinforces your company's mission and vision. And while some case studies may call for longer-form content, no one wants to read War and Peace. Tabs can help with this by keeping the essentials composed on a single page – and you can always link to deeper content as needed.
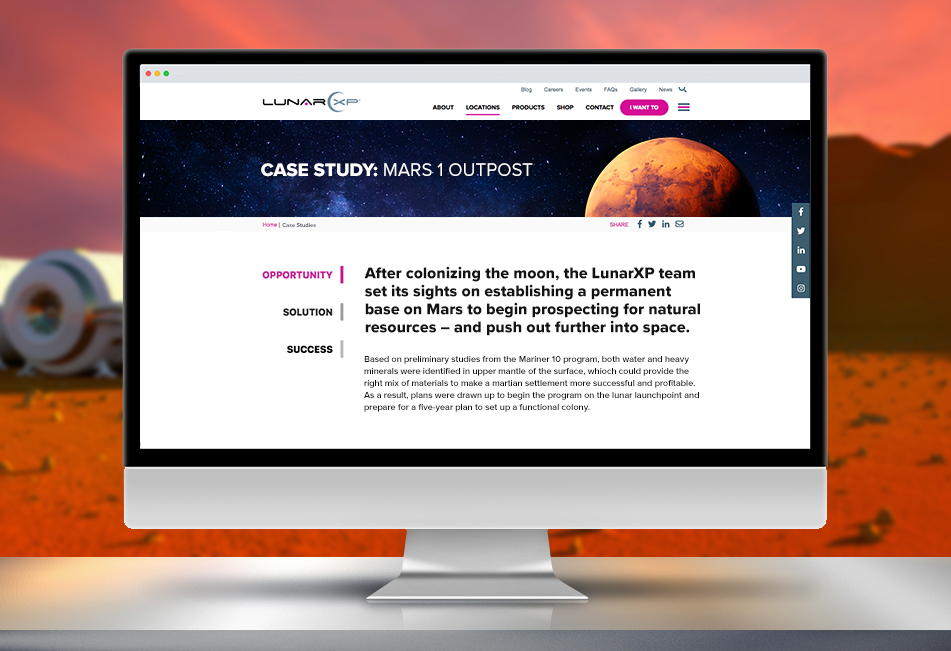
The example below will give you the code and direction for building your own case study with three links: Opportunity, Solution, and Success (feel free to change these titles). By clicking on each tab, you'll be able to surface new content without leaving the page. The result is fun, interactive, and takes the UX to another level.
I think we've made our case. Have fun building.
Getting Started
The CDN links below are links to all the Bootstrap files. Go ahead and place them in your project's file inside the head tag:
HTML
The HTML below features two main parts: A ul list that contain the tab links and the corresponding tab content. We have used "opportunity", "solution", and "success". Feel free to change the names of the tab links for your website and switch out the content inside the tabs:
CSS
In the CSS code below, we set the necessary properties of elements sich as the text alignment and the display properties. Feel free change the values of the colors, font size and family to match with your own website style:
And there it is! Check out the JSFiddle example below to see how it looks before committing to its use:


