How to Track Goal Conversions with Google Tag Manager
Congratulations! You got people to your website. Now the trick is tracking them with analytics, and Google Tag Manager can help.


We’re big fans of Google Tag Manager. The container itself is easy to implement and allows non-technical users a way to easily include scripts, pixels, and other tracking components to their website. It even allows you to get extremely granular with when, where, and how specific tags are called.
Naturally, when either creating a new tag container for a fresh project or transitioning an existing website over, there are a few essential tags you will want to set up. One of the most important is ensuring that a site’s Analytics property loads through the Tag Manager container. Fortunately, there is a preset configuration to do just that.
With your Analytics embedded through Tag Manager, you can now begin the process of adding a whole slate of goal conversions so that you can maximize your data and see what specific elements on your website are generate significant user engagement.
What’s a Goal?
Goals are defined points of user engagement as defined in Google Analytics. You can specify a wide variety of goals within your Analytics account, from specific form submissions and link clinks to page views and ecommerce purchases.
You can find and configure these goals under the “Administration > View Goals” screen in your Analytics account. Set up whatever goal you want to specifically measure/track and which pertains to the type of user engagement you’re seeking. For example, we will want to successfully register a “conversion” when anyone fills out a generic form on some set of landing pages:
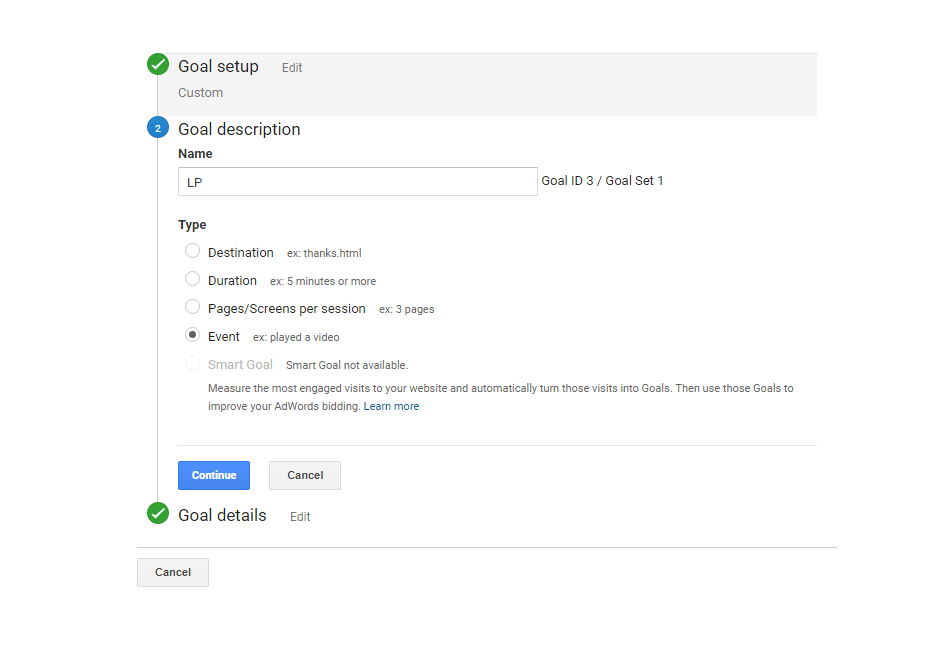
This goal is an “Event” type in that it is set to measure a specific user-initiated action. In this case, that action is whenever someone submits the form that they see on a given landing page. There are a variety of other types of goals, including destination (whenever a specific page is viewed), duration (whenever a use spends a certain amount of time on a page) and Pages/Screens.
Configuring Tracking in Google Tag Manager.
As with all elements in Google Tag Manager, you'll need two specific pieces: (1) a firing trigger and (2) the tag itself. Broadly speaking, the tag you configure will only appear accordingly to the parameters of its firing trigger. A firing trigger can be something as global as “all page views” or as granular as a specific button click. This is where the power of Tag Manager comes into play as you can make all of these specific settings without the need to dig down into your site’s underlying source code.
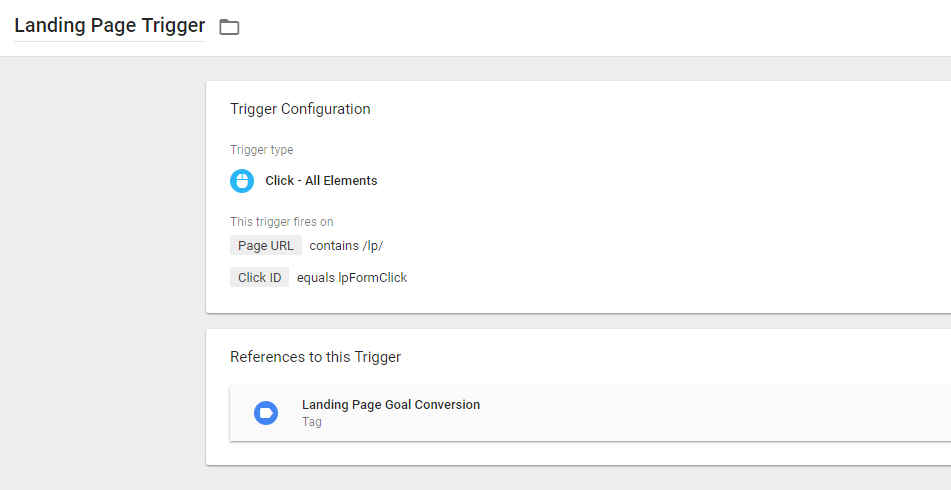
For our example, we will create a “Landing Page Trigger”. This trigger is configured to fire when the following conditions are met: (1) the page contains “/lp/” in the URL (our permalink structure for landing pages which prevents the tag from firing on other areas of the website) and (2) which the user clicks on an element with the id of “lpFormClick” (the specific ID associated with our landing page form submit button). Altogether, this trigger will only fire on certain pages that have “/lp/” in the URL and only if a user clicks on the form’s submit button.
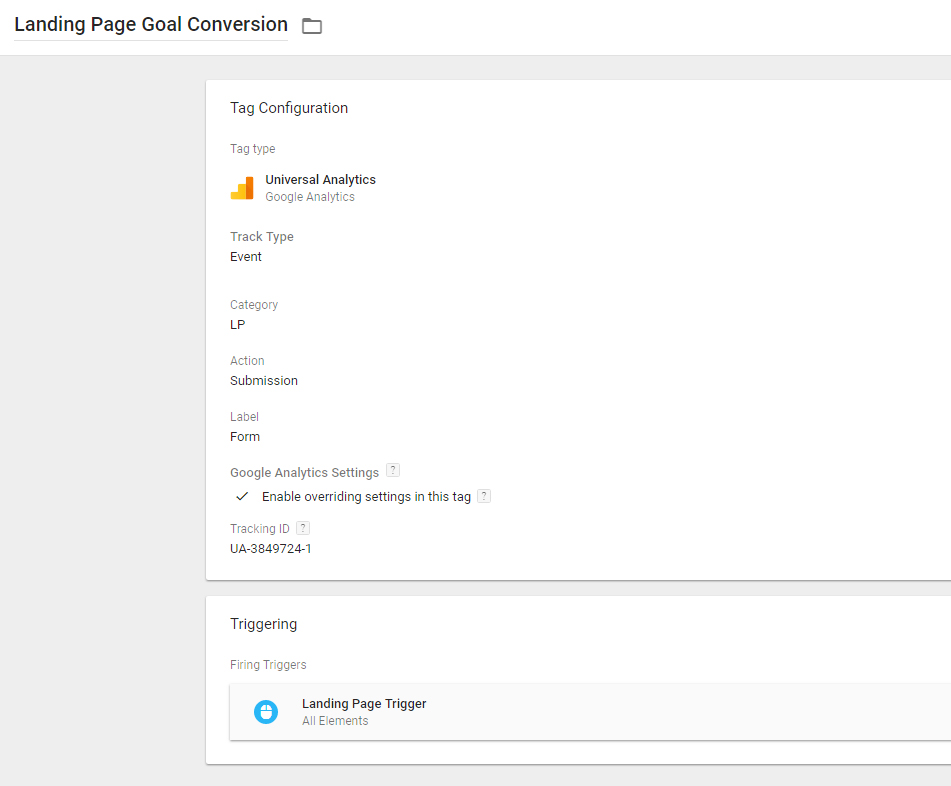
With the trigger created, we now need to set up our “Landing Page Goal Conversion” tag. Use the default “Universal Analytics” tag type. Accordingly, the other fields should then match the specific parameters of the Analytics goal you initially created. With those values configured, you just need to associated the specific trigger to the tag:
Save everything and submit/publish your container changes. With everything in place, your goals will now successfully be triggered from within the Tag Manager container and your data will start to show in Analytics.
By configuring your goal and event tracking directly to use Tag Manager, you open your team to greater possibilities. They can easily turn on and off tracking without the need to go through developers and remove various scripts from a site’s template files or source code. Take advantage of those possibilities and harness the power of your data.

Scott Madara
Contributions Editor here at Solodev. Want to be featured on the Solodev Blog? Get in touch.
Follow me on Twitter


